
Before I tell you how to upgrade to Google Analytics 4, let’s set the record straight.
GA4 is not a simple update. It’s not a measly shift. It is an entirely new product.
And a frightening one.
I’d say maybe that’s just me, but new is scary. Having to relearn everything you know is scary. Going from expert to novice like *that* is scary. You can admit it to me.
But you didn’t get where you are by chickening out when things got scary.
This blog will walk you through the steps to make the switch because you’re capable—with the right resources.
That said, if your time is limited or you want to leave it in the hands of professionals, our team can tackle it for you. Just loop us in.
Let’s Start From the Beginning: A Brief Background
When you understand why a change is happening, it’s easier to accept and follow what’s to come. We talked a little about it a couple of years ago when Google first announced GA4, but here’s what’s been simmering.
Google Analytics 3 (aka Universal Analytics) was great for tracking web engagement on desktop devices, but apps were not its strong suit. Instead, businesses used Firebase to measure app engagement.
Both tools were powerful, but tracking users across your app and website was painstaking.
As Russell Ketchum, Director of Product Management for Google Analytics, put it:
“People expect to interact with businesses when and how they like, such as browsing a brand’s website to research a product and then purchasing it later using the brand’s app. Getting insight into these cross-platform journeys is critical for businesses to predict customer needs and provide great experiences—but it can be very challenging.”
Furthermore, tracking users with cookies continues to be met with scorn. Per Ketchum:
“Universal Analytics was built for a generation of online measurement that was anchored in the desktop web, independent sessions, and more easily observable data from cookies. This measurement methodology is quickly becoming obsolete.”
In response, Google Analytics chose to combine the capabilities of Universal Analytics and Firebase into one platform that could handle tracking between websites and apps and wasn’t so reliant on cookies. They named the platform App + Web. (Outstanding, I know).
App + Web progressed until, in late 2020, Google decided to turn it into Google Analytics 4.
Now…
Now, if you create a new Google Analytics property, your default property is a GA4 property, and if you choose to continue to use Google Analytics, you have no choice but to make the GA4 transition.
Unfortunately, as GA4 is a unique entity from Universal Analytics (UA), you can’t simply turn your UA property into a GA4 one; however, you can link your new GA4 property to your existing UA property.
At Boldist, we’ve spent the past year learning the ins and outs of Google Analytics 4 and transitioning our accounts and clients’. In other words, we’ve successfully—and smoothly—transitioned businesses from UA to GA4. And I figured we’d help you too.
Moving forward, I’ll cover:
- Why You Need to Migrate Now
- Tracking UA and GA4 in Parallel
- What Makes GA4 Different
- Do You Already Have a GA4 Property?
- How to Switch to GA4
- Auditing Your Analytics Needs
- Creating a GA4 Property Through Your UA Property
- Saving Universal Analytics Data from Deletion
- How to Connect an Existing GA4 Property to Your UA Property
- Creating a GA4 Property From Scratch
- Adding GA4 Directly to a Website Builder or CMS
- I Set Up GA4. Now What?
- Tracking Events with GA4: The Basics
- Ecommerce Tracking in GA4
- GA4 Migration FAQs
Of course, you can turn to alternative analytics tools, but that choice is yours. Either way, knowing what you need to do to switch to GA4 will help you make that decision.
The Deadline Approaches: Why You Need to Migrate Now
Google announced that standard Universal Analytics properties would stop processing new hits on July 1, 2023. 360 Universal Analytics properties have a year longer to get their affairs in order and will stop processing new hits on July 1, 2024.
The earlier you migrate to the new version of Google Analytics, the more time you’ll have to acquaint yourself with the platform and sort out any complications.
Additionally, as you can’t move your prior data from UA into GA4, migrating as soon as possible will allow you to collect some historical data within GA4 before switching entirely to the new platform. Ecommerce businesses with YoY metrics to track or that plan to take advantage of GA4’s machine-learning capabilities—algorithms take time to train—should take special heed.
You can simultaneously collect the data in UA and GA4 until UA is cut off; this is called tracking in parallel.
Tracking in Parallel
GA4, being the baby it is, will continue to experience frequent updates. As a result, if you have a Universal Analytics account, leave it intact so you can use it as a stable tracking method while you customize GA4 to your needs.
And yes, having both UA and GA4 working on your website is safe, and they shouldn’t interfere with one another.
That said, we recommend using Google Tag Manager (GTM) for your tagging needs. If you added Universal Analytics tags through GTM, you can safely create your Google Analytics 4 Tags in the same GTM container. If you added your UA tags through gtag.js instead of GTM, now is a great time to switch to GTM for GA4.
So, What Makes GA4 Different?
I said GA4 is a new breed, but that doesn’t mean anything on its own. Let’s review the basics of what’s changed, shall we?
- It’s event-based. Forget organizing events by category, action, and label. UA’s method of tracking was outdated and more complicated than necessary. Now, everything is tracked as an “event.” Page views, transactions, and every other interaction you might measure is an event. You’ll notice that this will change the information you include in your GTM tags.
- You can combine web and app data. If you or a client owns a website and mobile app, you can stream data from both to the same property.
- You have free access to BigQuery. In the olden days of UA, only premium users could stream data into BigQuery. Now, that opportunity is available to all—free accounts included.
- Data will expire. One Google Analytics change for the worse is that your data will expire. It’s automatically set to expire after two months, and the longest you can configure it to remain is 14 months. This makes it essential to have a system in place for exporting data and is likely the reason for the new free access to Bigquery.
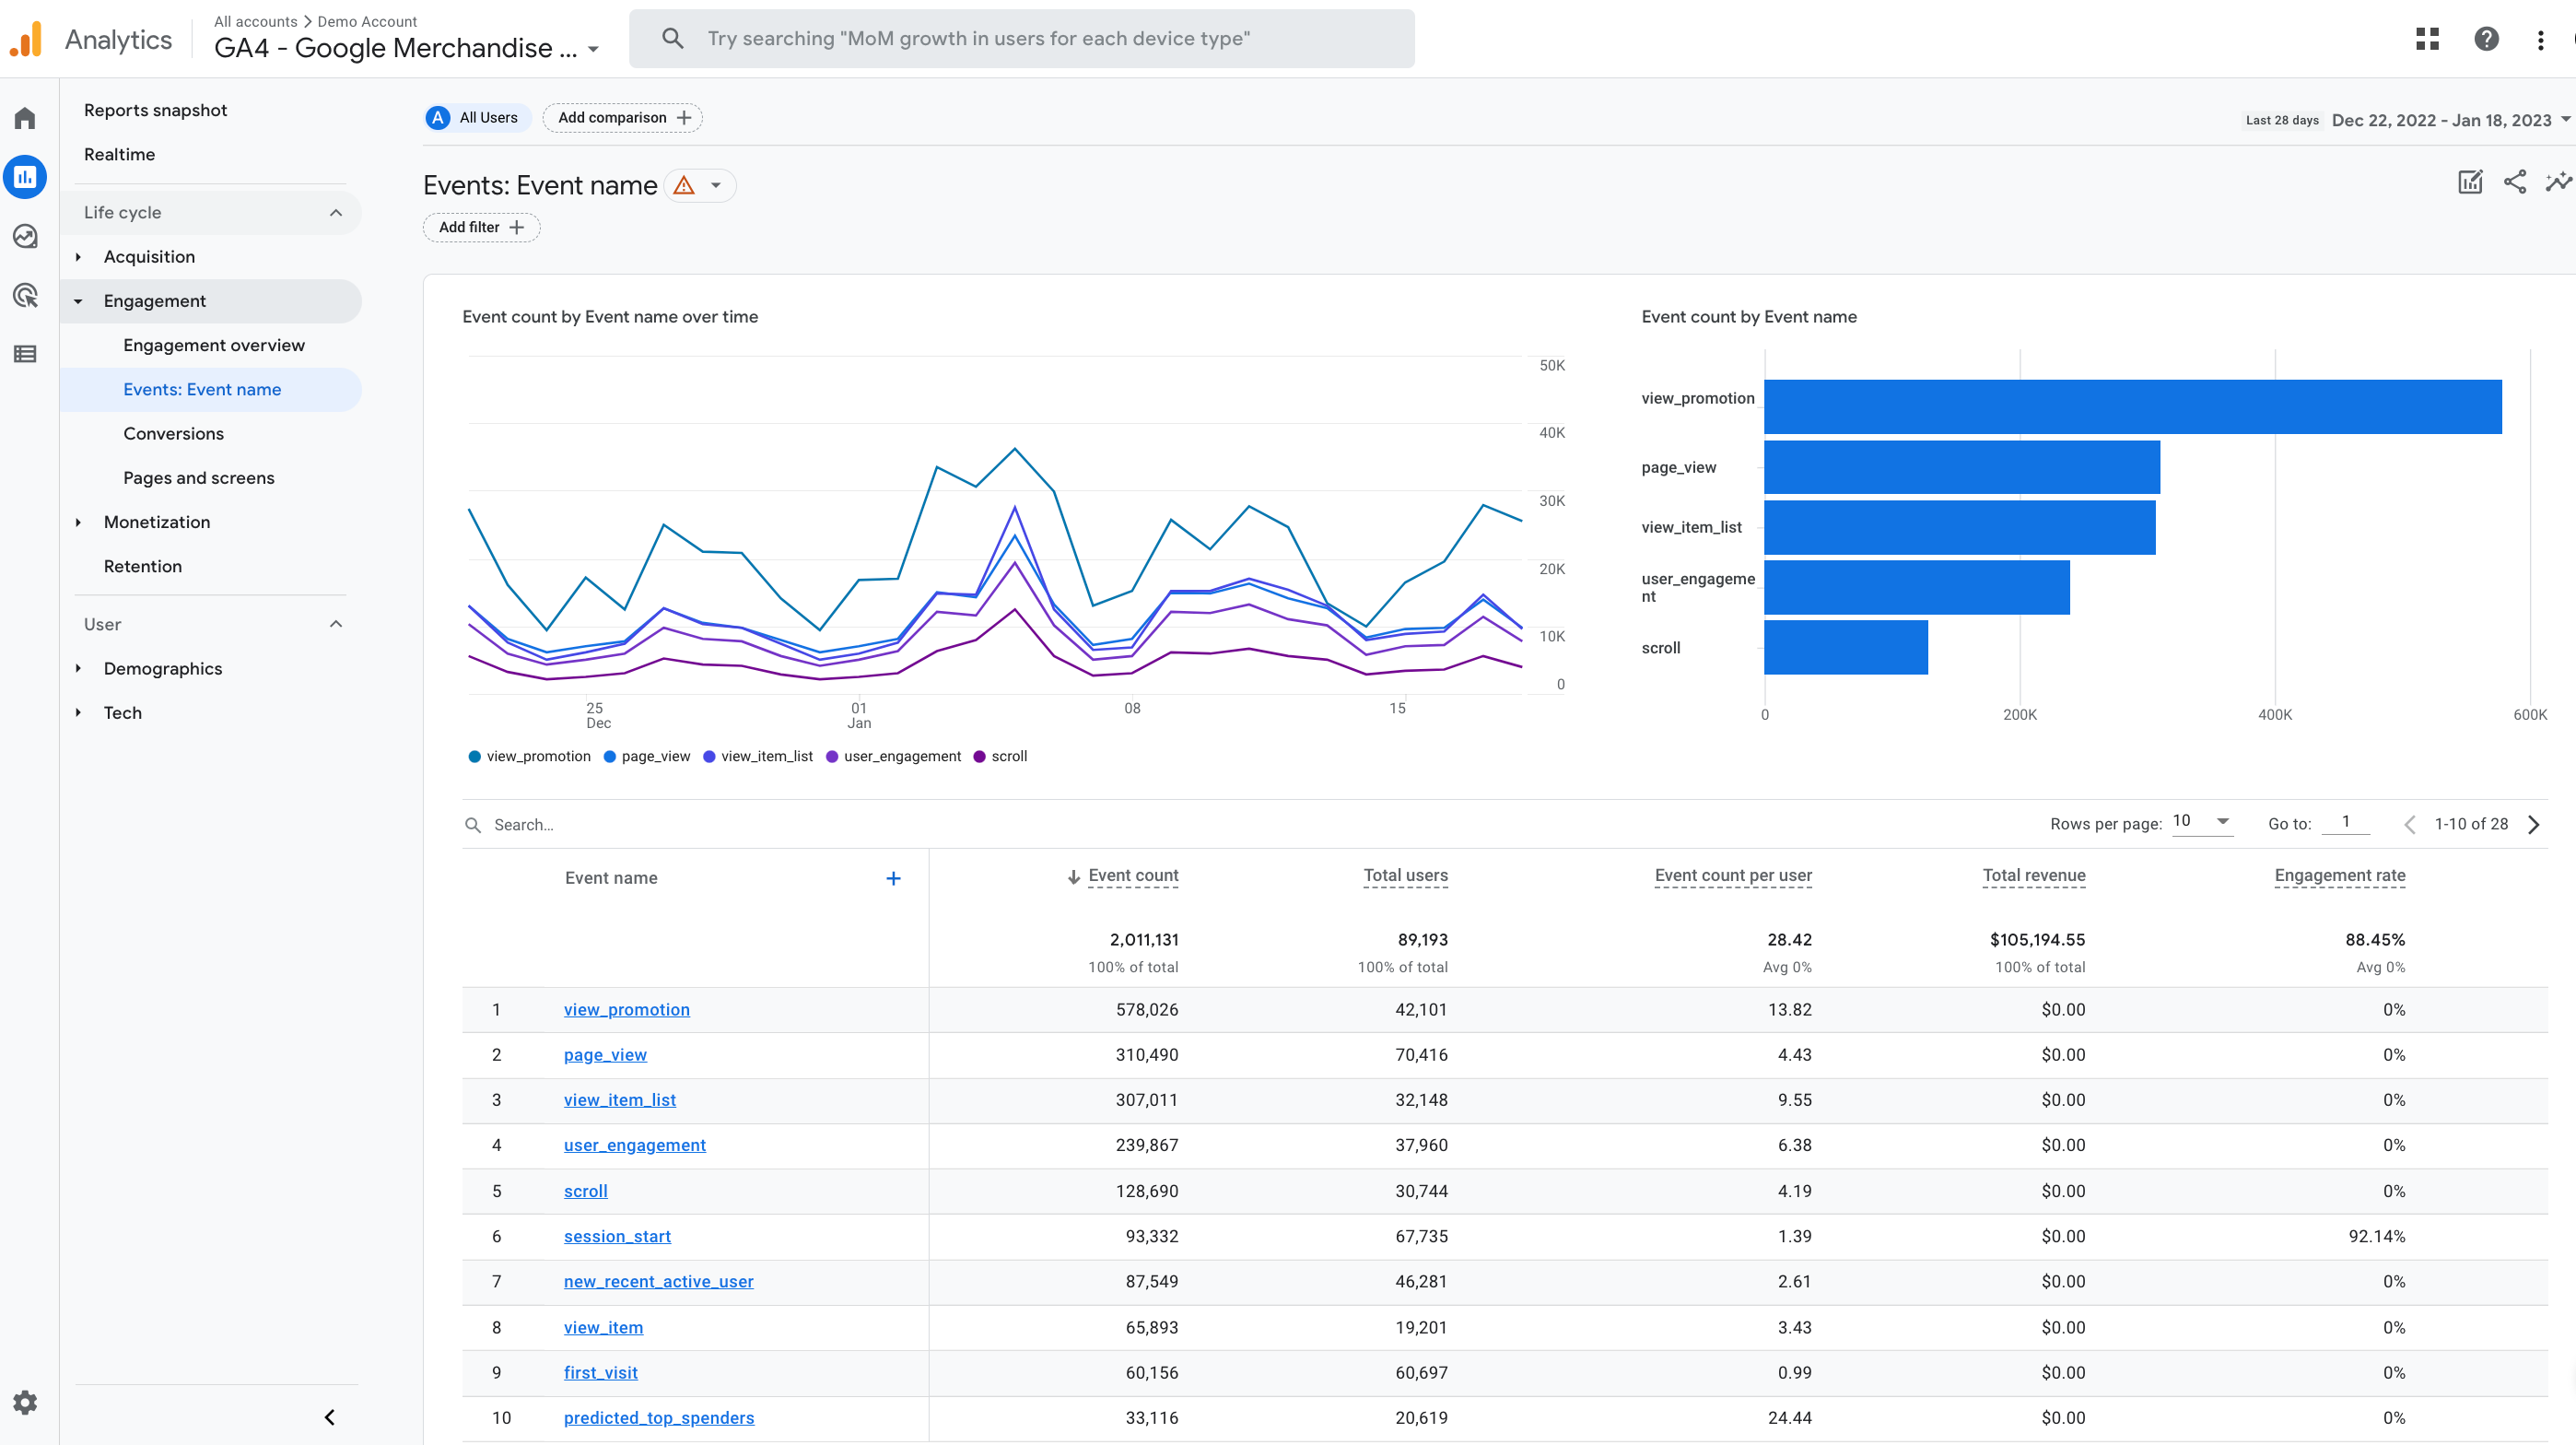
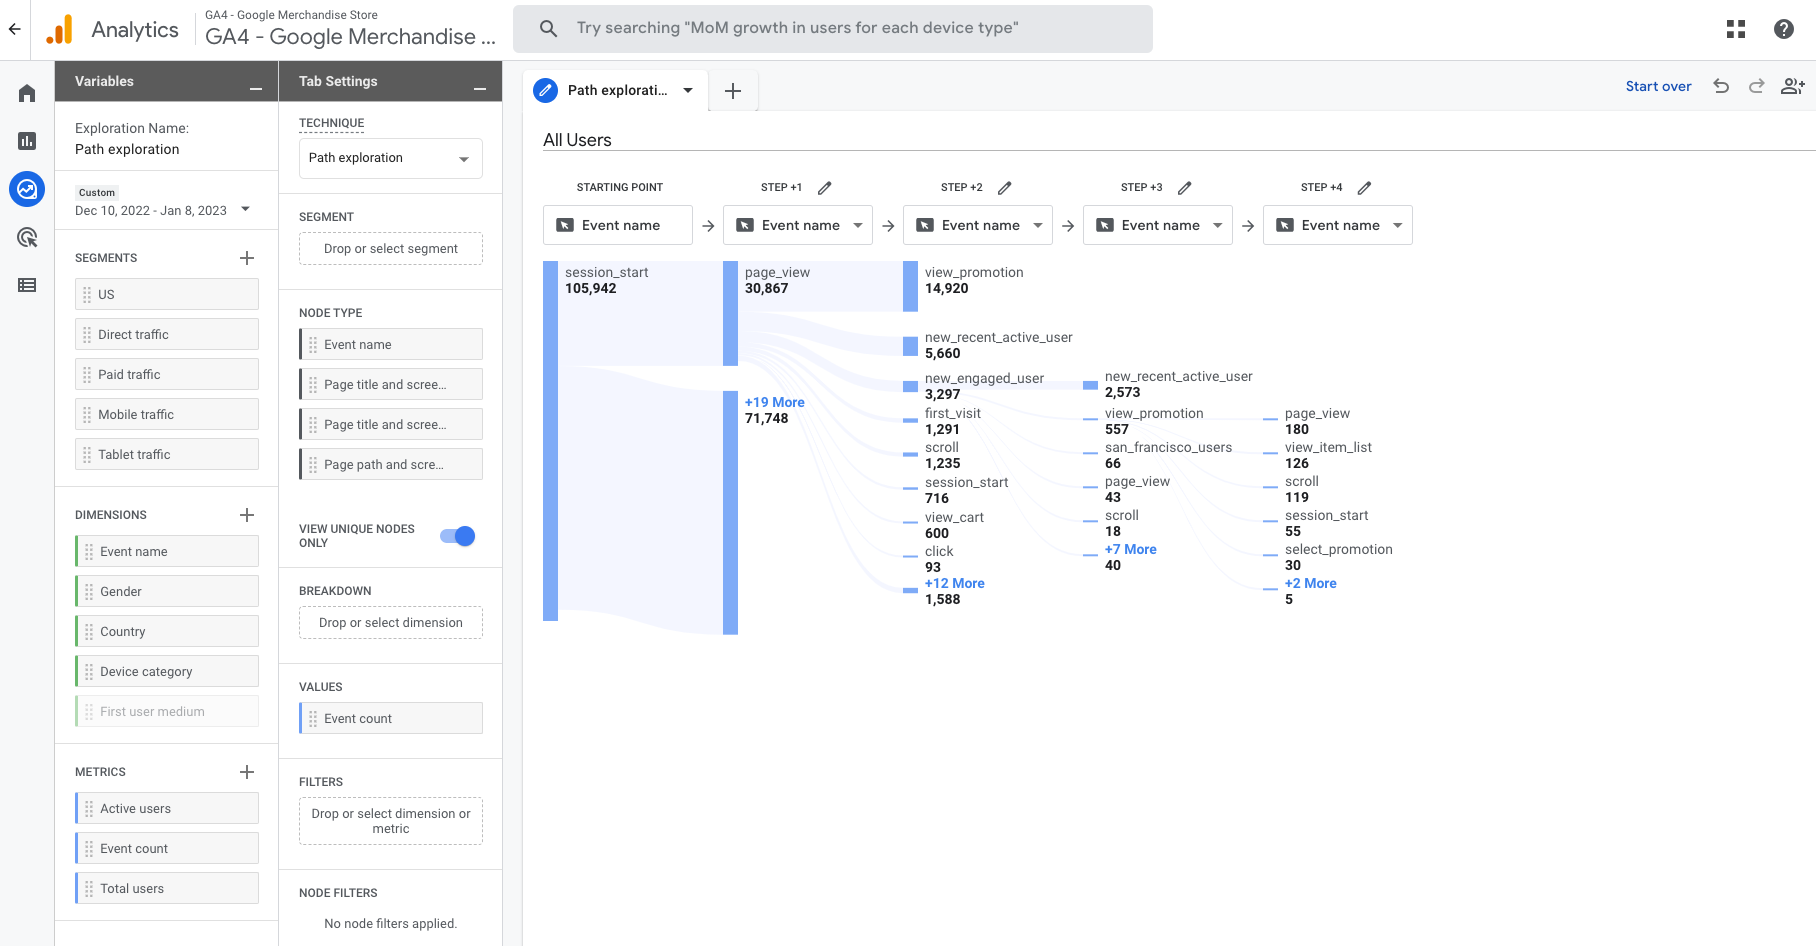
- Reports have improved. GA4 reports have undergone a complete renovation, including free access to features that were once only available to GA 360 accounts. The most valuable updates are to GA4’s funnel and pathing reports that allow you to track customer journeys, including where users enter, drop off, and what they do in-between steps of your funnel.
- Data modeling is flexible. You can now choose your data’s attribution model for reporting. It’s automatically set to data-driven, but your other options include last click, first click, linear, position-based, and time decay. If you change your attribution model, the change applies to historical and future data.
- There are more automatic tracking options. GA4’s “Enhanced Measurement” setting allows you to track more data automatically. In addition to page views, you can track outbound clicks, scrolls, video interactions, site searches, and file downloads without any effort on your end. Of course, customized tracking is best, but this provides a quick way to get started.
- Bounce rate has changed. In the beginning, GA4 did away with bounce rate—sure enough, marketers freaked. Now it’s back! Albeit, a little different. In UA, bounce rate was the percentage of all sessions where users viewed only one page, triggering only one request to the Analytics server. The Google Analytics 4 bounce rate is the percentage of sessions that aren’t engaged.
Per Google, “If a user visits your website, reviews content on your homepage for less than 10 seconds, and then leaves without triggering any events or visiting any other pages or screens, then the session will count as a bounce.” You can add the new bounce rate metric under Explorations or in Report Customization. - There are machine learning advancements. A significant GA4 upgrade is the ability to use machine-learning algorithms to fill data gaps among user privacy updates and offer insights and predictions about user behavior. We expect the capabilities of GA4’s machine learning to grow with time.
- Integrations are in progress. Since GA4 is relatively new, some integrations available in Universal Analytics are still missing. As GA4 updates, we expect this to change, so keep an eye on your integration options.
- And, of course, the UI is different. Sure enough, with a shift so major, you would expect the user interface to shift too. Getting used to the new organization and terminology will take practice and hands-on exploration. For example, “Behavior” reports are now “Engagement” reports. “Pages” are now “Pages and screens.” The list goes on.
For more information on comparing data between Universal Analytics and Google Analytics 4 after you create your GA4 property, refer to this GA resource.
Pause! Do You Already Have a GA4 Property?
Don’t waste your time. Before creating a GA4 property, ensure you don’t already have one. There are three scenarios in which you might (even if you didn’t make one intentionally).
- You created your property after October 14, 2020. Google Analytics 4 became the default property at this time, so you’re likely already using GA4. To verify, access your Google Analytics account and view your properties. Universal Analytics properties have a “UA-” prefix in their property numbers; GA4 properties do not.
- You had an App + Web property. All App + Web properties became GA4 properties, so you already have one. This means you’re ahead as long as you were effectively tracking data before. You will, however, want to look out for new features. To access your property, navigate to it from your GA account.
- The year is 2023 or later. According to Google, if you haven’t created a GA4 property by early 2023, the Setup Assistant might make one for you—unless you “opt-out of this directly in the Setup Assistant or in the notification banner that will appear.” Check the properties in your GA account for one that doesn’t have “UA-” listed before the property number.
If none of the above scenarios apply to you, it’s time to update your Google Analytics.
Now: How to Switch to GA4
Upgrading to Google Analytics 4 is a lot more work than updating your code. To make the process digestible, we suggest splitting it into phases:
Phase 1: Set up your GA4 property.
Includes creating the property, adding data stream(s), and adding the tracking tag to your site/app.
A data stream is where you collect data from. It can be a website, iOS app, or Android app, and many streams can exist in the same property. Google has recommendations for how to set up Google Analytics 4 based on your business structure.
The tracking tag is how you collect the data from a stream.
Phase 2: Add events related to your key performance indicators.
Includes meaningful interactions, conversion events, etc.
Phase 3: If you’re an ecommerce business, add e-commerce events.
Yes, these are considered different from regular GA4 events.
Phase 4: Implement other customizations.
We’re talking integrations, audiences, report customization, etc.
Phase 5: Conduct an implementation audit and adjust.
To make sure everything in your GA4 property tracks correctly.
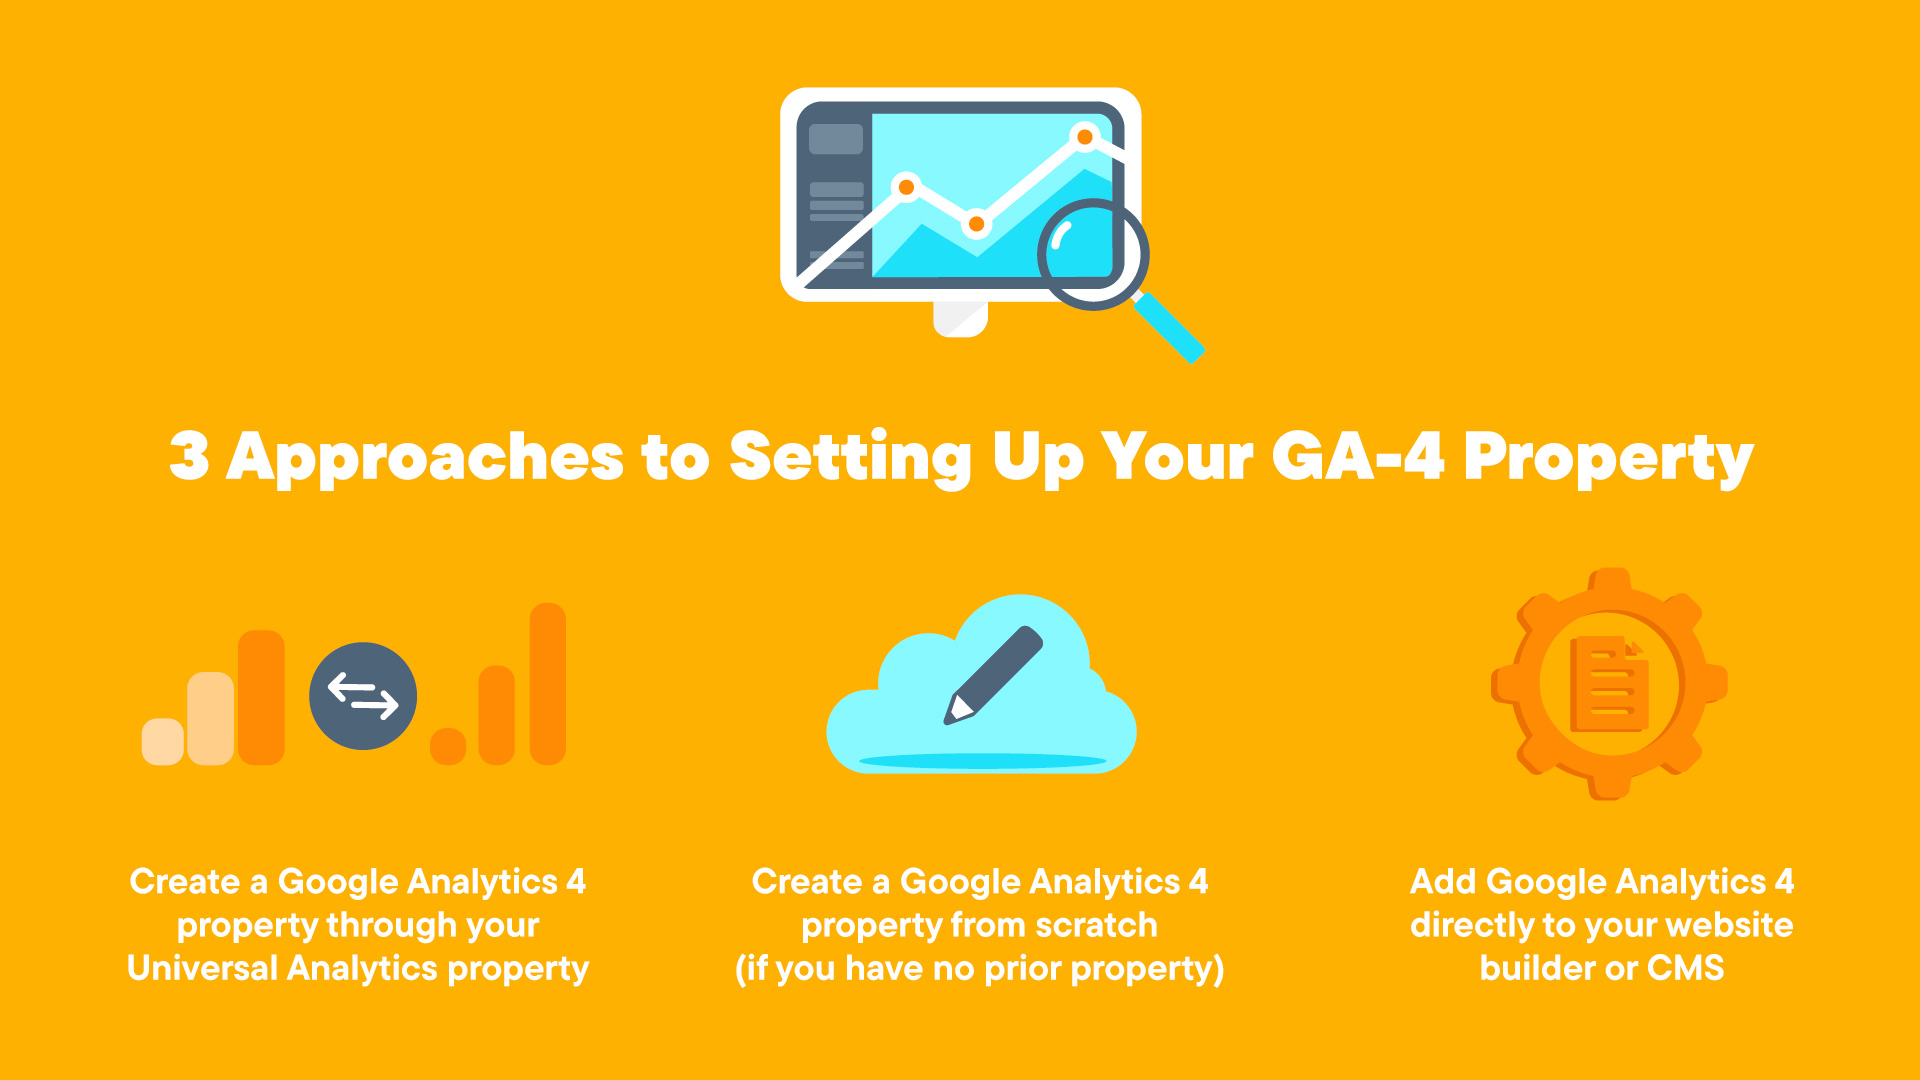
In this GA4 migration guide, I’m covering phase 1—setting up your property. There are three ways to approach this phase based on your current analytics setup:
- Create a Google Analytics 4 property through your Universal Analytics property
- Create a Google Analytics 4 property from scratch (if you have no prior property)
- Add Google Analytics 4 directly to your website builder or CMS
I cover each of these step-by-step below, but no matter which you’ll use, you should start with an analytics audit.
Audit Your Analytics Needs
Whether you have a Universal Analytics property, another analytics tool, or your analytics are nonexistent, it’s wise to audit your needs before upgrading to GA4. Doing so allows you to review the strengths and gaps in your current analytics setup (if you have one) and think about what you want to get from your analytics moving forward (to guide a worthy setup).
From a great audit comes a great plan.
To audit, begin with an overview of your general structure—all the tools you use and any accounts or properties within them. Note essential elements, like key settings or integrations. Think about whether this is the most efficient setup for your company.
Then, compile a complete list of what you track. If you don’t have a current setup, think about what you want to track. Remember that your goal in analytics is to collect data that will tell you how to improve your customer experience. Include things like:
- Events and Parameters
- Goals/Conversions
- Content Groupings
- Custom Dimensions/Metrics
- Referral Exclusions
- Audiences
- Reports
We recommend also asking members of your company’s departments what data they think would be valuable to their work.
Once you complete your list, evaluate what you want to keep, what you can discard, and what gaps might exist that you can fill in. Keep in mind your customers’ personally identifying information (that can benefit your business) and your obligation to protect their data.
After your audit, make a plan that outlines your goals for implementation and clarifies your priorities. If you have an overwhelming number of events or reports you want to implement in GA4, add them in batches based on those priorities.
Now you’re ready to get hands-on.
Tip: If you struggle with the three methods below, visit Google’s resource on setting up analytics for a website or app.
How to Create a GA4 Property Through Your UA Property
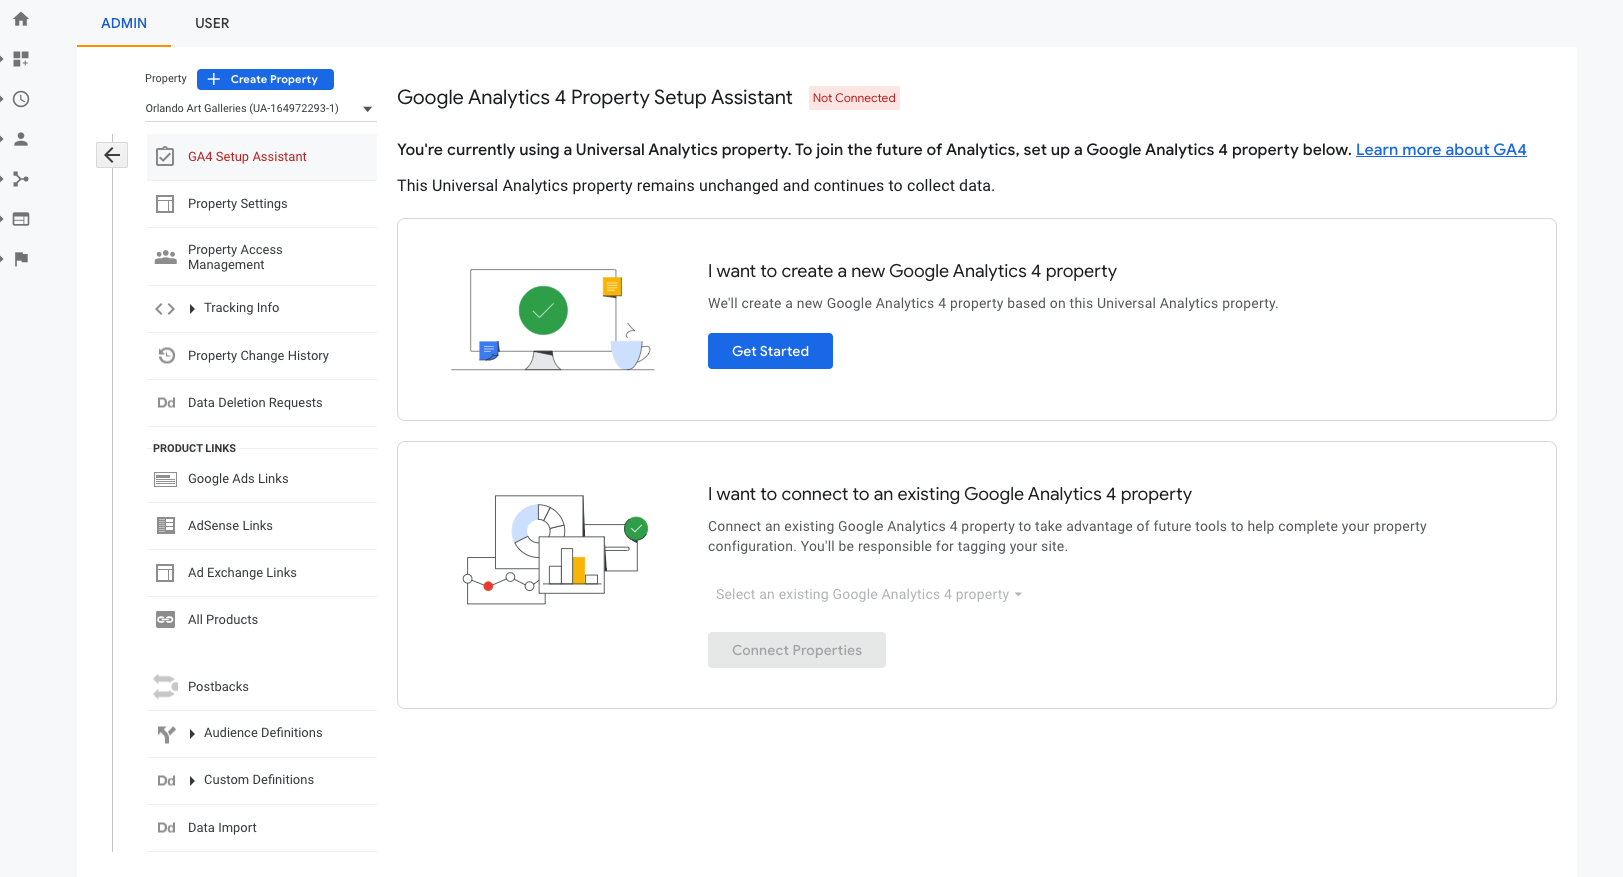
There is a GA4 Setup Assistant that will help you create your new Google Analytics 4 property and set up parallel tracking using your current Universal Analytics property.
The Setup Assistant won’t affect your UA property; it simply creates your new property and lets you reuse some of your current settings. Your new GA4 property won’t contain any historical data, and you’ll need to customize your GA4 data collection in post.
Follow these steps to create a GA4 property from UA:
- Log in to your UA property.
- Navigate to Admin.
- Click on GA4 Setup Assistant.
- Go under the message “I want to create a new Google Analytics 4 property,” and click Get Started. If it’s not your first time, and you want to connect to an existing property, jump to the section titled How to Connect an Existing GA4 Property to Your UA Property.
- Review the pop-up that appears:
- Copy your basic settings from your Universal Analytics property.
- Decide whether to activate Enhanced Measurement or not. Doing so enables GA4 to track the listed events from the get-go, but you’ll have to update these later if you plan to customize them.
- Decide if you want to enable data collection using your existing site tags. Tag reuse saves you from adding the tag manually and is made possible via connected site tags; however, this only works if your tags were coded using gtag.js.
- We recommend using Google Tag Manager instead of gtag.js for setting up Google Analytics 4 because it’s flexible, easier to update, and a great place to manage all event tags moving forward. Plus, when you add a new pixel, like the Facebook pixel, you can manage everything through GTM’s centralized platform. To use GTM instead of your existing site tags, you’ll add your tag manually later.
- Accept the pop-up settings by clicking Create Property. The assistant will automatically create your GA4 property and take you to a screen with your property ID.
- Click “See your GA4 property.” You’ll see a collection of property settings you can configure from here whenever you’re ready.
Now, to start collecting data, you need to complete your tag installation. Follow these steps:
- In your new property, go to Data Streams.
- Select your data stream. It should have automatically generated when you created your new property from your Universal Analytics property. This is where you’ll see your data stream’s measurement ID.
- If you need to add another data stream, click “Add stream” and select the stream type (web, iOS app, or Android app). Enter your data stream source information. For a website, this is just the URL and what you want to name the data stream. Then click Create Stream.
- On your data stream’s detail page, under a section titled Google Tag, click “View tag instructions.”

- Choose to install the tag via a website builder/CMS or to add manually through gtag.js or Google Tag Manager, and follow the detailed instructions provided. As I said above, we recommend using Google Tag Manager (GTM) for all tagging needs.
To add your tag through GTM, follow these steps:
- Open GTM in a new tab.
- If you haven’t in the past, create a GTM account and install your container.
- Go to Tags and click New.
- Click on Tag Configuration.
- Select “Google Analytics: GA4 Configuration.”

- Copy your measurement ID from your GA4 account, and paste it under Measurement ID.
- Opt to “Send a page view event when this configuration loads” if you want to track page views automatically (recommended).
- Scroll down to the Trigger section, and select “All Pages” for the trigger.
- Name the tag something like “GA4 – Config/Page View.”
- Test your changes in GTM:
- Click on Preview.
- Follow the instructions to connect if needed.
- Look for your new GA4 tag among the tags fired.
- Test your changes in GA4:
- Go back to GA4, and exit the web stream details if they’re still open.
- Go to Reports and then Realtime. You may need to interact with your website to generate data.
- Make sure your interactions appear in the report. Data can take up to 30 minutes to appear in the Realtime report.
- Go back to GTM, and click Submit.
- Name the GTM version and publish it live.
Now you’re running a GA4 property that will collect data! Don’t worry if you can still see the GA4 Setup Assistant in your UA property; clicking on it should only take you to a page that shows your connected GA4 property.
From now on, when you view your properties from your Google Analytics account, you can identify your UA properties as they will have a “UA-” in front of the property number, and your GA4 properties won’t.
Saving Universal Analytics Data from Deletion
Universal Analytics won’t just stop collecting data in 2023; Google is also going to delete all your historical data in UA.
“After July 1, 2023, you’ll be able to access your previously processed data in your Universal Analytics property for at least six months. We know your data is important to you, and we strongly encourage you to export your historical reports during this time.”
“360 Universal Analytics properties will receive a one-time processing extension ending on July 1, 2024.”
Because UA and GA4 are completely different in how they collect and report on data, you can’t import your historical data from UA to GA4.
But all isn’t lost.
While you can’t stop Universal Analytics from deleting your data, you can export your UA data through BigQuery or another tool. UA accounts don’t have free access to BigQuery unless you have GA 360, but you can export your data as reports using a CSV or the Google Analytics Spreadsheet Add-On.
How to Connect an Existing GA4 Property to Your UA Property
If you already created a GA4 property that you didn’t connect to your Universal Analytics property and want to connect it with your UA property now, here’s how. These steps will also work if you had a Web + App property that turned into a GA4 property.
- Log in to your UA property.
- Navigate to Admin.
- Click on the GA4 Setup Assistant.
- Under “I want to connect to an existing Google Analytics 4 property,” use the dropdown to select your existing GA4 property.
- Click on Connect Properties.
That’s it! If you need to rename either of your connected properties to help distinguish them, you can do so under Property Settings.
How to Create a Google Analytics 4 Property From Scratch
You’ll need to create your GA4 property from scratch if you have no prior Google Analytics property. It is possible to have a Google Analytics account with no property.
If you already have a GA account:
- Log into your GA account.
- Navigate to Admin.
- Click “+ Create Property.”
If you don’t have a GA account:
- Go to analytics.google.com
- Log in to your Google account.
- Click on Start Measuring.
- Name your account. (Your account can host several properties, so it’s important to decide how to structure your account in advance.)
- Select your data-sharing options.
- Click Next.
Now you’re caught up, whether you had to make an account or not. To finish creating your property:
- Name the property. Use your company, website, or app name.
- Select the most relevant time zone and currency. You want to pick these based on your server or clients’ location.
- If you also want to create a new Universal Analytics property, click “Show advanced options.” Flip the toggle to make a Universal Analytics property, and select to create a linked GA4 property along with it.
- Click Next.
- Provide more business information (optional).
- Click Create to finish creating the property.
- Read and accept the terms & conditions. You may have to choose the types of email communications you want from Google.
- Now you’re in your new property. Complete the guided tour if you feel so inclined.
Next up: get the data flowing in. Since you didn’t have a Universal Analytics account to connect, you’ll add your data stream(s) and install your tag—in that order.
To add data stream(s):
Your GA4 property can have up to 50 data streams, including websites and iOS and Android apps.
- In your property, navigate to Admin.
- Click on Data Streams.
- Click “Add stream” and select the stream type.
- Enter your data stream information.
- Decide whether you want to use Google’s Enhanced Measurements.
- Click on Create Stream.
To install your tracking tag:
- On your data stream’s detail page, scroll down to the Google Tag section. Click “View tag instructions.”
- Choose to install the tag via a website builder/CMS or to add manually through gtag.js or GTM, and follow the detailed instructions provided. We recommend using GTM.
- If using GTM, your instructions for tag installation are the same whether you created your GA4 property from scratch or from an existing UA property. Refer to the previous section under “Follow these steps to add your tag through GTM.”
How to Add Google Analytics 4 Directly to a Website Builder or CMS
Some platforms, including WordPress and WooCommerce, provide native support for Google Analytics 4. These platforms offer an easy way to add your tracking tag after you add your data stream: simply paste your “G-” ID into the Google Analytics field the CMS provides.
To find your “G-” ID:
- Go to your Google Analytics property.
- Navigate to Admin.
- Click on Data Streams.
- Select the data stream for your website.
- Here you’ll find your “G-” ID.
Your platform will have its own instructions for where to add your “G-” ID, like WooCommerce does.
If your platform doesn’t support the “G-” ID, all it means is that you have to add your tracking tag using gtag.js or Google Tag Manager. Follow the instructions for tag installation above, based on whether you are creating your property from scratch or through UA.
I Set Up GA4. Now What?
Earlier in this guide, we split the process of migrating to GA4 into five phases. Phase 1 was creating and setting up your GA4 property.
At this point, you’ve accomplished just that, but we still have some, let’s call ‘em bonus tips, before you jump into adding your events and customizations.
We highly recommend taking the time to:
- Review all your property settings.
- Familiarize yourself with the new interface.
- Exclude internal traffic so that it doesn’t affect your analytics.
- Make a plan to keep up with the ins and outs of GA4, or invest in google analytics consultants who will help you. As a new tool, GA4 is expected to make many additions in the coming months. Include review dates and staff training in your plans.
- Make a plan for how you’ll integrate GA4 with the business as a whole. How will it help different departments? How will you use it for reporting?
- Turn on Google signals to collect extra data about users who have turned on ads personalization and are signed in to their Google accounts.
- Increase your data retention to the max of 14 months. You can do this under data retention in your data settings.
- Decide how you’ll export and store data when it has run its 14 months.
- Link your Google Ads with your analytics property.
- Explore the GA4 demo accounts. There is a GA4 demo account for businesses with standalone website data and those with web and app data. Demo accounts are great for training and getting inspiration for your own Google Analytics 4 setup, but you need an account to access them.
- Decide when you will start only using GA4 if you’re starting with parallel tracking. If you have the free version of UA, you’ll have to migrate to GA4 as your primary analytics source on July 1, 2023.
Tracking Events with GA4: The Basics
The changes to Google Analytics event tracking are a big enough topic for their own guide. Still, a quick overview at this point in your migration journey will do you some good. Let’s hop into the basics.
There are four types of GA4 events:
- Automatic events: GA4 automatically tracks these events upon installation. These include events like first visit, user engagement, and in-app purchases.
- Enhanced measurement events: These events are automatic only once you enable them in your data stream settings. They include page views, clicks, scrolling, site search, video engagement, file downloads, and form interactions.
- Recommended events: Recommended events are just that—not automatic but recommended by Google to put in place.
- Custom events: Custom events are those you create and customize yourself.
Though GA4 can track more events automatically than its predecessors, the real power of analytics is in tracking events specific to your business. You may even find it worth it to create custom events to replace the automatic ones that don’t follow the exact rules you need.
To add custom events in Google Analytics 4, you’ll have to:
- Create consistent naming conventions for your events (for organizational purposes). We recommend referring to the naming conventions established by Google’s automatic and recommended events.
- Determine the events you want to track.
- Determine the parameters for each event. Determine the parameters for each event. Parameters are the information collected when the event occurs, like a page’s title or how far a user scrolls.
- Add your events. This is easiest to do in Google Tag Manager using the “GA4 Event” tag.
- In GA4, add custom dimensions for each parameter you’ve created. This step is necessary if you want the parameters to appear in your reports.
- Mark your conversion-based events as conversions. This is how you’ll track conversions in your reports and use them for ads optimization and remarketing.
Ecommerce Tracking in GA4
Run an ecommerce store? You can add ecommerce-specific events to collect information about your users’ shopping behavior. Some of Google’s recommended events are for online sales, including view item, purchase, refund, and select promotion.
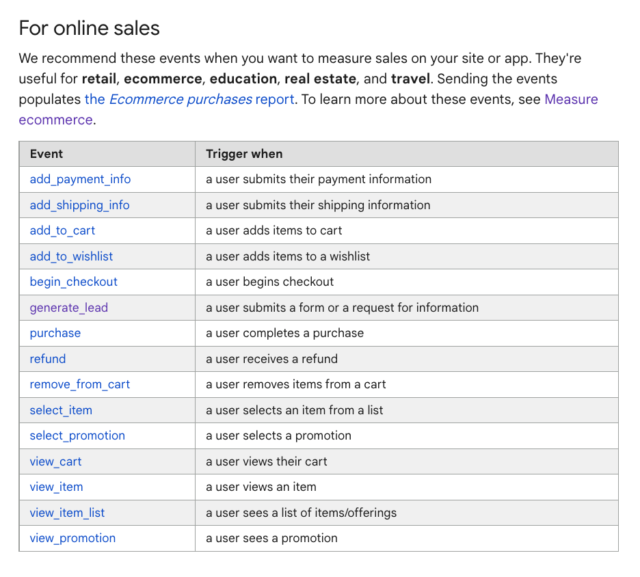
Ecommerce events can help you understand a customer’s journey with your products, quantify your most popular products, and evaluate the influence of your promotions on revenue.
Google Developers explains your options for migrating an ecommerce setup from a Universal Analytics property to a Google Analytics 4 property.
GA4 Migration FAQs
When should I switch to Google Analytics 4?
You should switch to GA4 right now. Really. Universal Analytics will stop working (processing hits) on July 1, 2023. The sooner you transition, the more historical data you’ll have in GA4 and the more time you’ll have to adapt to the new platform.
Can I have Universal Analytics and Google Analytics 4?
Yes! You can run UA and GA4 properties at the same time; this is called dual tracking or parallel tracking. You can continue to use Universal Analytics while you complete your Google Analytics 4 customizations.
How long does it take to migrate to GA4?
Migrating to GA4 can take anywhere from a couple of weeks to six months. Once you set up your property, it will start collecting accurate data within 24 hours; however, setting up your GA4 events and other customizations will take longer. The exact amount of time depends on the number of data streams and the complexity of your business. For businesses that rely on YoY metrics, it will take a year to collect the necessary data in GA4.
Can I migrate historical data from UA to GA4?
Sadly, you cannot pull historical UA data into GA4. The two platforms are too different in their data collection models and data storage. We recommend exporting your UA data and reports for reference going forward.
Do you need Google Tag Manager to use GA4?
You don’t need GTM to use GA4, but it is one of the easiest ways to create and manage your GA4 events. It’s what we use for ourselves and our clients.
Is Google Analytics 4 better?
While GA4 is still relatively new and lacking in some areas, it is on track to be a significantly better analytics solution than Universal Analytics. With a more modern events setup, improved user privacy features, and the ability to combine data from several data streams in one property, GA4 will provide more relevant information and better customer journey tracking.
How much does GA4 cost?
A standard GA4 account is free and more than enough for most businesses. Enterprise companies can upgrade to a paid tier of GA4 called Analytics 360. GA 360 has higher limits for property data collection, reporting, and export to BigQuery.
How many events can you have in GA4?
You can have up to 500 distinctly named events per app data stream, and there is no limit for web data streams. However, there are other event collection limits to be aware of, including the number of parameters per event and the character length of event names. All maximums are high enough to be workable.
Is there no bounce rate in GA4?
When GA4 was first released, no metric was available for measuring bounce rate. This is no longer the case, and you can add the bounce rate metric under your Report Customizations or Explorations. In GA4, the bounce rate is the percentage of sessions that aren’t engaged.
Set Up Google Analytics 4 ASAP
I’m a firm believer that most things in life don’t need to be stressful. The best way to keep the stress away during a major Google Analytics upgrade? Give yourself—or your team or agency—plenty of time to get it done.
And we’ve said it twice, but thrice is the charm: the earlier you start, the more time you have to familiarize yourself with the GA4 platform and customize it to your business’s needs.
Change sucks, but believe me, so many good things are going to come out of this.
Don’t have the resources?
We’ll tackle GA4 for you and turn your data into riches. Get in touch.